Who says you have to go to a salon to get a professional manicure? With the right equipment, you can do it at home like a pro. We will show you the best step-by-step tips for beautiful nails. Follow the guide!
What is the best nail care kit?
Before starting anything, gather the essentials: a soft nail file, cuticle pusher, base coat, nail polish, and top coat. For a longer-lasting finish, you can use a gel polish with a lamp; otherwise, “gel effect” polishes that dry naturally.
What are the first steps to perfect nails?
1
Start by trimming your nails. After washing and drying your hands, cut and file them to the desired shape and length. Always file in the same direction: if you go back and forth, your nails are more likely to split.
Short and square or long and tapered? To determine which nail shape to choose, simply look at your cuticles. If they are squarer, choose a rectangular or squoval nail shape (straight tip and rounded sides); if they are more rounded, choose a long, oval, or almond shape to give the illusion of longer fingers.
2
Take care of your cuticles. Soak your nails in warm water to soften them, then push the cuticle back with a cuticle pusher to expose as much surface area as possible. Attention: Proceed with care: since cuticles form a barrier against germs and bacteria, you don't want to damage them or push them back too far.
Do your cuticles tend to split or bleed? They may need some extra moisturizing. To restore their suppleness and strength, take care to coat them with a nourishing oil every day. This kills two birds with one stone, as it also prevents ridges from appearing on the surface of your nails.
3
Prepare the work surface. Using back-and-forth movements from the outer edges toward the centre pass a very fine-grained buffer over the entire surface of your nails. Then clean them with a cotton ball soaked in acetone-free nail polish remover: they will be smooth and clean, ready for polish.
Apply gel to nails, with or without a lamp
Option 1 - Gel finish with lamp (enhanced hold)
- Base: Apply a thin layer, then cure for 30 seconds to 2 minutes under a UV/LED lamp, depending on the device.
- Colour: 1 to 2 coats of polish (better hold), polymerizing between each coat.
- Top coat: Colour is sealed, then catalysed one last time for an ultra-glossy, long-lasting finish.
Have you been invited to a celebration, a graduation ball, or a Christmas party? Don't panic, we have just what you need for fabulous nails. Check out our article.
Option 2 - No lamp, air dry
- Base: Smooth and facilitate adhesion.
- Colour: Two thin layers.
- Top coat: Protect and boost shine.
Here, the keyword is patience: Allow to dry completely between coats to avoid smudges and an uneven finish.
Easy home manicure: tips and tricks
- Are you pressed for time? To help the nail polish dry faster, spray it with a quick-dry spray. This reduces drying time and minimizes the risk of smudges.
- To treat, strengthen, and harden nails between polish applications, use a moisturizing and revitalizing treatment.
- Is one side giving you more trouble than the other? Make sure you place the hand you are applying the polish to flat on a table. With the other hand, hold the brush between your thumb and index finger, and press the side of your hand against the table. This will give you better control during application.
- To avoid overlapping, always leave a millimetre without polish at the base and sides of the nail.
- If you've gone over, use a nail polish correction pencil to clean up any excess.
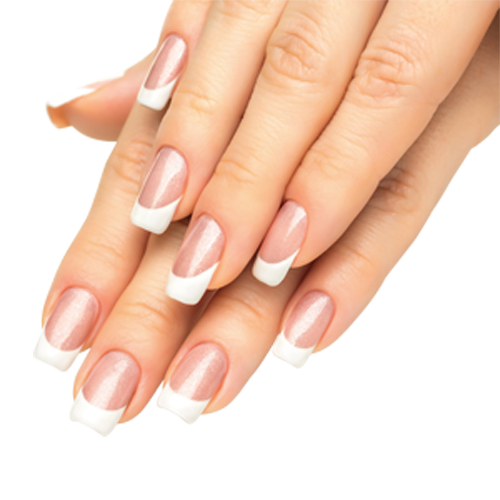
How to make the white line for a French manicure?
There are 3 options for a French manicure:
- Using a self-adhesive guide: Stick an arched guide 1-2 mm from the edge, apply white polish to the end, and remove the guide before it is completely dry. (Handy for a clean line.)
- Freehand: Apply a small amount to the brush, move from the centre to the sides, keeping your hand flat for stability, and correct the curve with a fine brush dipped in nail polish remover if necessary.
- Press-on "French": For immediate results, you can also have French Kiss false nails applied (various shapes and lengths, salon finish).
Common mistakes to avoid
- Avoid back-and-forth filing, which promotes splitting. File in one direction.
- Do not cut or push cuticles too far. They protect the matrix. Don't attack them!
- Avoid applying thick layers of polish and allow sufficient time for drying. If these two steps are not followed, the polish may wrinkle, leave marks, and chip more quickly.
Picking your nail polish off, shaking the bottle before application, not applying a base coat, too many coats of polish. In short, these are all mistakes to avoid in order to achieve a perfect manicure. Check out our article Common mistakes that can ruin your manicure.
Express routine and at-home gel manicure kit
The express routine for a perfect manicure:
- Wash and dry hands.
- File and shape.
- Soak, gently push back cuticles, rinse and dry.
- Apply base coat.
- Apply two thin coats of colour.
- Seal with top coat.
At-home gel manicure kit:
- LED/UV lamp
- A base coat
- A nail polish colour selection kit
- A top coat
- Accessories (soft nail file, manicure stick, towel, etc.)
And there you have it: an at-home manicure that's shiny, clean and worthy of a professional salon. Have fun!